
Repair Log
Fixing & Modding is half the fun.
Fixing & Modding is half the fun.
Table of Contents
|
February 12th : Coco 2 (#1) B&W Image, Sound Issue
February 15th : Coco 3 (#1) Sound Issue February 17th : TI99/4a (#1) Unknown Condition February 20th : C64, Vic 20 PSU (#1) February 20th : Atari 65xe (#1) (Part 1) |
February 21st : Atari 65xe (#1) (Part 2 & 3)
February 21st : Atari Xegs (#1) Cartridge Slot Issues February 22nd : Atari Xegs (#1) Change the internal game February 23rd : Atari Xegs (#1) Keyboard Issues |
|
Newest to Oldest
*I will be adding Pictures in the future* February 23rd, 2018
Atari Xegs (#1), Keyboard Issues Letters A through H are non functional. This leads me to believe their is an issue either on the control pcb or the buttons themselves. After disassembling the keyboard, I learned to my dismay that the internal pcb is a flex pcb. This means if the problem is on the flex pcb, their is virtually no reasonable way to repair it. Pulled out the DMM and started doing some continuity test. First trying to get a siginal from the A button to the pin on the control pcb. This resulted in nothing. Then I removed the flex pcb. Continuing the testing on the edge connector exclusively. One pin was bad, confirming my dread. Further inspection of the flex pcb, revealed several other traces are heavily oxidized. Unless a replacement can be found, I will require to build a replacement keyboard. Luckly someone very skilled has released the pcb and firmware for an adapter, to do as such. Called the TransKey-II. Which requires you to be able to program a pic16f1847. They do offer a solution for this as well. 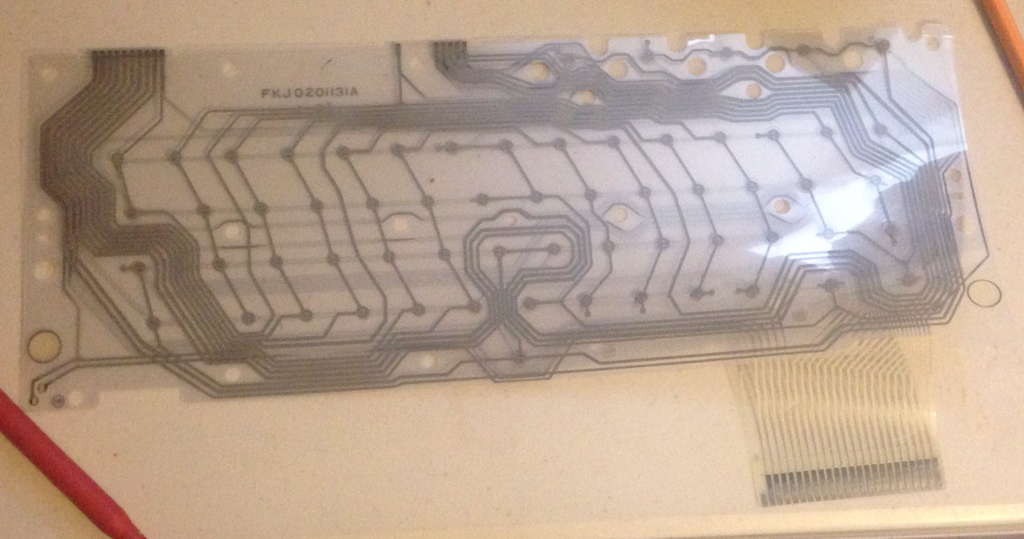
February 22nd, 2018
Atari Xegs (#1) Change the internal game As some of you may know, the Xegs has Missile Command built in. Which activates when the keyboard isn't plugged in. I'm experimenting with changing this game to another 8KB game. Unlike several other Atari 8bit computers. I'm making presumptions that the ic contains the OS (16KB), Basic (8KB), on the same eprom. As their are no independent ic identified as to the ic containing the basic kernel on the Xegs mobo. Assuming it holds the game rom. (Edit: Source found, it does in fact contain the game rom, basic, and os). It took several tries, experimenting with the order to concatenate the 3 roms. So far only the OS and Basic have had functionality restored. Sadly, no game as of yet. I've used both generic 27256 (nmos) and TMS27c256 (cmos) eproms. Order of concatenated files, that allowed for Basic and Self Test to be booted. RevB.rom Basic (8KB) short hand B SpaceInvaders.rom (8KB) short hand si Rev4.rom OS (16KB) short hand 4 Possible combinations to concatenate the roms. 4/B/SI Failed 4/SI/B N/A B/SI/4 Basic and Self Test accessible, so far no game. B/4/SI Failed SI/4/B Failed SI/B/4 N/A I'm using the direct rom dumps, as anything with a xex, etc have headers for emulators. This size difference would surpass the maximum of 32KB (32,768 bytes) available to a 27256 eprom. What will happen in the next portion of the experiment. I want to verify that the missile command is in fact on the same eprom. Through a process of elimination, a new file will be concatenate with B(8KB)/B(8KB)/4(16KB) and programmed onto a 27c256 (32KB). If this works and i'm able to access Basic, self test and missile command. More digging will be required to find the missile command rom's location on the mobo. Alternatively, if missile command does not boot and the order of B/GameRom/4 is correct. I must surmise that my game rom files tested so far, are in fact bad dumps. Testing of the rom(s) in a emulator, will then be required prior to proceeding. If the roms pass via the emulator. A eprom will be programmed as B/Missile Command/4 bin file later and giving that a try. If that works, I will continue to proceed with say Qix. Update 1: Still February 22nd I burned an eprom with RB/RB/R4 (Basic RevB 8KB/ Basic RevB 8KB/ OS Rev4). Inserted into the xegs, and it booted directly to Basic. Then executed the self test. Using the Reset button to access the feature. It preformed Rom Ram and Visual Audio Test. Rom Ram Test, all showed green. 2 for the Rom, and 48 dots for ram. Last 16 are reserved for special programs, as noted on February 21st, Atari 65xe (Part 3), check Manual. As before, Visual and Audio Test worked flawlessly. No game rom was observed. Update 2: Still February 22nd Here is where it gets confusing. So I burned a RB / Missile Command / R4. Placed it in the socket. Keyboard is not plugged in. Boots up into basic. Reset allows Self Test as usual. Turn her off and plug in the keyboard. Proceed to turn her on and the unit boots into Missile Command. This throws me back. So I figure, perhaps my previous assertion about the order was in fact wrong. So I burn another eprom. 100% guessing the first two 8KB are interchangeable in the series of 8KB/8KB/16KB. Upon turning the system with Missile Command / RB / R4. A black screen comes up with either the keyboard plugged in or not. My short hand again Rev4 OS = 4 RevB Basic = B SI= Space invaders (Rom was a bad dump) MC = Missile Command (Seen Working on Xegs) Status of Possible combinations to concatenate roms. 4/B/SI Failed 4/SI/B -N/A- SI/4/B Failed MC/B/4 Failed B/4/SI Failed B/SI/4 -Basic and Self Test accessible, so far no game. B/MC/4 Basic, Self Test, and MC all work. With the oddity of Missile command booting with the keyboard plugged in, and basic booting with it unplugged. Next on my check list. Will be going back to the B/B/4 eprom. Observing its behavior with the keyboard. This is when I wish I had an oscilloscope. May try do up an eprom with RevC Basic. As a quick search found an article by digital press identifying RevC as the version of Basic used by XE units. Next best thing is research to find out what controls the selection between Basic and Game rom. Assuming the keyboard normally performs a loop in the connector. I need to find a diagram for the xegs. Though in the meantime, I found a diagram that I will have to look at later. Looks like you could hook up a xegs keyboard to other 15p connectors on 130xe units. Update 3: Still February 22nd Just felt like relaxing outside of the work shop this evening. So I decided to continue my work on the laptop. Found the rom of C101687 online. Time to do some investigating, using a hex editor. As I do believe its human error at this point. So I loaded the C101687, RevC Basic, Rev4 OS and Missile Command into individual windows. Did a quick visual comparison of several lines of code that indicated the order in which it is concatenated; Missile Command / RevC Basic / Rev4 OS. Which is a order that has not worked for me. Though in previous attempts I did try to use RevB Basic. Even with the known working Missile Command rom. Then I remembered HxD allowed file comparison under the analysis menu. Literally 2 bytes of information are different. That exist in the Missile Command portion of the code. I'm not a programmer. Nor am I pretending to be one. Only knowing enough to fool around with this editor and figure stuff like this out. Again, its half the fun. Line 000011C0 C101687 original rom BD 51 FB C9 3A B0 0A C9 30 90 06 E9 30 85 86 10 My concatenated rom BD FE FE C9 3A B0 0A C9 30 90 06 E9 30 85 86 10 So tomorrow I will be burning my own concatenated rom. Testing it and see how it turns out. As all my previous concatenated files were using RevB basic. Not sure if this would have made any issues. Though, Id rather work on this before making modifications to hardware after doing more research. On the plus side, this may also resolve the issue that I had created in previous attempts. With the Basic being first 8KB portion of the 32KB rom. Causing it to boot with no keyboard attached. Then Missile Command booting with the keyboard attached. Update 4: Yeap, its still the 22nd. Quick Update Decided I need to go back into the workshop. I fervently needed to know the burning question in my head. If those two bytes would be at fault for the issues i've been experiencing. That being very unlikely, as it's already been seen working. On the other hand, was it the RevB Basic I had used, vs RevC Basic. The new concatenated file that minus those two bytes is identical to the original C101687. Indeed, it did in fact work. RevB was part of the problem. It also resolved the issues with the keyboard. So my original presumption of Basic / Game Rom / OS was incorrect. It is in fact Game Rom / RevC Basic / Rev4 OS. Tomorrow, I will attempt to install a different game. I will be using HxD hex editor for this. Due to its many features. Update 5: February 23rd Final Update for now. So I tried installing Tetris by radosoft, this game is smaller then 4KB. So the three attempts, were to place it at the beginning, end, and flush end of the 4KB. None of these attempts worked. Take into account that the file was a xex extension. So probably doomed from the beginning. Next attempt was with Star Raiders, .rom extension. This one also did not work. I acquired my roms with the .rom extension from Here. SR and Qix were both verified roms from cartridges. If you do a search, this is signified with a K under the Dump column. With no desire to mess around with SR any more I proceeded onward. This time, I went for my goal and tried Qix. The actual game i've wanted to install from the beginning. Woo successes has been achieved. Its not the super nice 5200 port, but still good none the less. Pictures below. Additional References: How to install a game on the 1200xl, post 19 and 21. Info on OS revisions. Additional info on OS revisions. Info on chip identification. Summary: Order of roms (Game Rom 8KB / RevC Basic 8KB / Rev4 OS 16 KB) to be concatenated. Image must be 32.0 KB (32,768 bytes).)Success was only achieved with .rom extension game roms, but is not guaranteed. Nor was my testing extensive. The HxD hex editor was used to do most of the work. Eprom tms27c256 was programmed with a gq-4x. Rom extension images from cartridge dumps marked K in dump column are Here . Most of the Atari basic and os roms are Here. 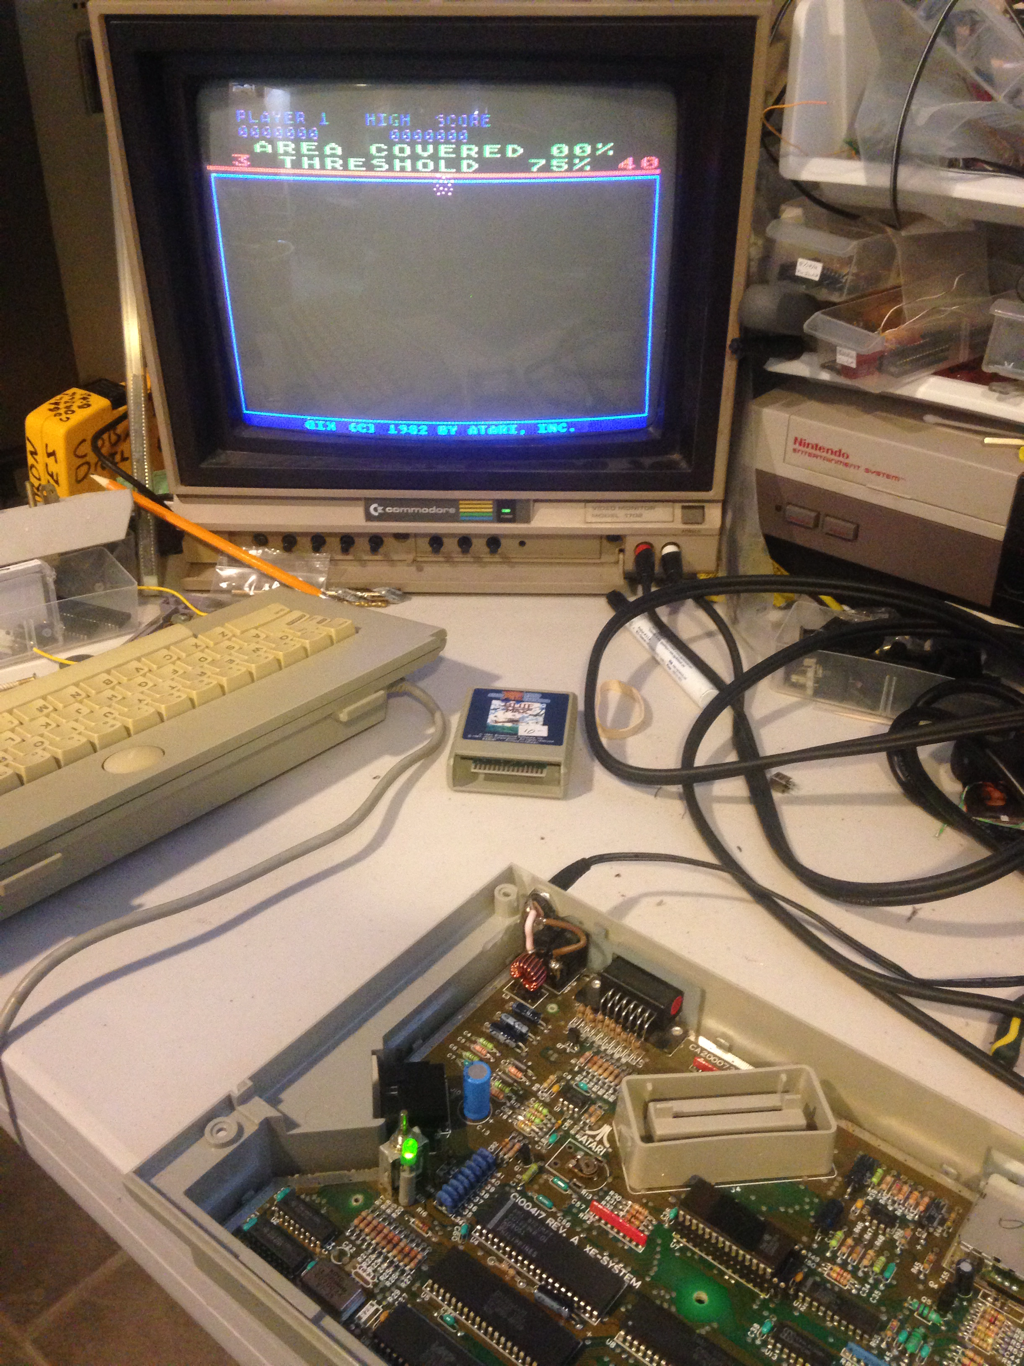
February 21st, 2018
Atari Xegs (#1) (Part 1) : Issue with cartridge slot. After disassembling the massive heavy shielding, I proceeded to reflow and add solder to all the sensitive parts. Power switch, the serial connectors and cartridge port. Hooked up my test rig to it as always. Tested the console with Blue Max cartridge. Its as picky as a front loading original Nintendo. This will not do, and I will need to find a replacement. Afterwards, a self test was preformed to make sure no other issues exist. This revealed an issue with the keyboard. Letters A through H are non responsive. I will be dealing with this issue at a later date. February 21st, 2018
Atari 65xe (#1) (Part 2) part 3 and 4 are below Client decided to trade in the console towards other products. I then proceed as planed. I removed and socketed 7 of the 8 ram ic's and the os rom ic. Then I replaced the ram with 4164-10. The original ram was 4264-15. Did a quick test and had a orange screen. A tad weird as this solid color screen isn't documented anywhere online. That could be found by me at this time. Next, I burned the Rev.2 OS onto a 27c128 eprom. Then proceeded to test it the system again. Now we have a black screen of death. I guess this is progress. In the morning, I will redo the thermal test. See if any of the replacement ram are in fact good or bad. In addition to following the instructions by BяеиsKi on Atari Age. That authored these great threads, that have helped me while doing this and other Atari 8bit repairs. Red Screen of Death, and Black Screen of Death. (Part 3) I did the sound test and thermal test this morning. No sounds were heard. None of the ic's became extremely hot. So I figured that thought U13 ram didn't fail the thermal test. I proceeded to replaced it at this point. Which I should have done in hindsight. As this prompted it to boot directly in Rom Ram portion of the self test. Only the first of two bars for the Rom lit green. Followed by 40 green ram dots. I removed and re-seated the os eprom into the socket. This resolved that issue and booted directly into basic on the next test. I then accessed the self test menu by typing BYE. This only allows me to directly inspect 5 of the 8 ram ic's to my understanding. Taking info from the Manual in regards to the self test. The self test menu also allows me to test the keyboard and sound. Both of which worked flawlessly. (Part 4) I will rotate the ram ic's, to make sure all ram is functional. Time invested 5h 30mins, incl. prep, research & labor Estimated time completing: 1h 30 mins. incl. Additional ram testing. Cosmetic cleaning. Modification for rca phono jacks and standard dc jack. February 20th, 2018
Atari 65xe (#1) (Part 1) Red Screen of Death Back story from client: The client had plugged a C64 psu into the machine. Upon realizing this, had a friend try to start it with a Xegs psu. This is when the Red Screen of Death was first observed. Extent of damaged unknown. Part 1: I connected up a test rig for gnd and +5v on the board. As well as connecting a test rig for the composite video. I proceeded to turn it on, observing the Red Screen of death. Afterwards, I left it on for 20 mins. Using the thermometer function on my dmm, it was determined that 7 of the 4264 and the os rom were hot enough to give you second degree burns. Client has decided to forgo with any repairs. Due to the nature of the how it was damaged and budget concerns. Though he maybe trading it in as parts. So this project may continue. (Part 2,3,4 are on February 21st) February 20th, 2018
Commodore 64/Vic 20 PSU Budget Build Parts used, a dead atx psu, dead c64 psu, nes power supply, a +5v psu from a d-link router and zip ties. After checking the ac output on the nes psu and the +5vdc on the other. I proceed to gut the atx psu. Cut off the full length of cable from the c64 psu, which has the 7pin din connector. I then cut off the cable, leaving 8 inches of cable on the respective nes and d-link psu sides. I then removed the appropriate amount of shielding of each core of every wire within each cable. Connecting and soldering the appropriate ac, +5vd and gnd wires together. Checking the continuity to make sure no errors are made. Once everything is verified, I proceed to install it in the atx psu. Soldering in parallel the two psu's to the panel mounted connector on the atx case for a standard computer power cable. Testing it again, because its always better to measure thrice, cut once. I then strapped everything to the case. I didn't have any shrink tubing on hand, so a copious amounts of electrical tape was used to cover/wrap any bare contacts. Normally, I would use grommets. Though, in this situation the atx case had a port I could reuse. Though to be prudent, I still strapped down the cable with another zip tie. February 17th, 2018
TI99/4a (#1): Unknown condition. This was a relatively quick and dirty test. I only have the console, no cables or official controllers. First I removed an ATX connector off a dead 2000's computer mobo. Modded the connector to trick a ATX psu to turning it on and staying on. Then I salvaged a cable from a dead colecovision psu. They have the same 4 pin connector the TI99/4a uses. I then used this to connect to a verified working ATX psu. Later on I will mod this ATX psu inside the housing to operate as a test bench psu. Inside the system. The wires leading from the case to the internal power supply connector. I removed those three cables connected to the internal psu. Then I installed a 4th cable to the power connector on the case. These four wires are then reconnected to the solder side of the molex connector on the internal psu. +5v, -5v, gnd and 12v to be more precise (Not in that order). This will disconnect the use of the power switch on the internal psu. Meaning, I have to use the switch on the ATX to power up the unit. Note: I can no longer use an original psu on this unit, as it would fry the unit. I need to make a label to notify myself or future owners of this mod. I then routed the composite and audio to RCA panel mounted jacks. I could have used a 5pin din a/v cable for a commodore. Though, I don't have any on hand. Upon powering up. The composite signal came out clear. No audio. All keyboard buttons work. Cartridge slot works. Remaining items to check or mod: Controller ports, and check the audio source. Install a 3 pole single throw switch, to control the power on the unit. Replace the power supply plug to prevent the wrong (original) psu from being plugged in the future. Label said connector as well. February 15th, 2018
Coco 3: (#1) No Audio/static on Audio line. Client assumed interference, due to rf signal going through daisy chain to tv and rca cables via switch. Tested the audio and video, on Commodore 1702 monitor, using heavily insulated RCA cables. Everything seems fine. Tested with Starblazer. Will personally retest on clients set up. Update: Using the composite signal and once we put it closer to tv within the series of switches. Using higher quality cables. All interference was removed. February 12, 2018
Coco 2: (#1) Black and white image (Part 1) While attempting to adjust the pot in the RF unit. It was observed that pressure on the pot housing, would temporarily rectify the issue. Assuming the pot was good and was suffering from a cold solder joint. We then de-soldered the rf unit from the mobo. Re flowed the solder and reinstalled on the mobo. This corrected the issue. Update: February 20th (Part 2), replaced the pot with a series of resistors (2.9K) to achieve the proper value. Then proceeded to do an overall test. Depending on the tv, there is significant static on the audio line. That almost drums out the sound from the game I tested. Additional Research will be required, until another donor or Coco 2 can be found. |
Upcoming Projects
Colecovision: Black and white Image. TI99/4a (#2): Unknown condition Commodore V-20: Keyboard Repair: Missing Keys Atari 2600 to TI99/4a controller adapter: HERE Modding a ATX power supply to use as my second test bench psu. On going side projects: C64 Test Harness Printing 2364 to 27c128 pcb with external switch. |