March 22nd, 2018
Nes Controller to Atari 8bit Computer
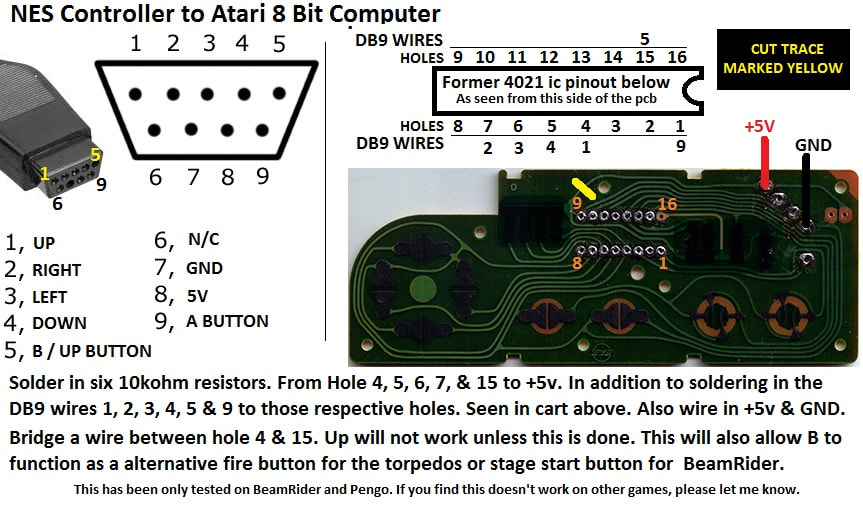
Prep work involved was relatively simple. Disassemble controllers (Nes and a junk genesis one), Desolder wires from respective pcbs. Then desolder the 4021 ic from the nes controller pcb. After that I had grabbed the DB9 pinout for the Atari 8bit/2600. Using a DMM I determined which colour wire was which pin. Writing this down on paper for future reference.
I then installed six 10kohm resistors for up, down, left, right, A, B. These resistors are then all wired to 5 volts. Soldered in the wires as determined by the online pin-out. Plugged the controller in and the result was as followed:
Left button was Left,
Down button was Right,
Right button was up; and
Up button was Down.
A and B were correct.
So even though every chart I could find online said it was correct. It didn't work as it should have. Proceeded to check my work 3 times. To err is human, I guess. I later discovered that the majority of the charts online were diagrams of the connector on the console, not the controller cable. It was simple enough to take note of the wire colours and their current function and location. Then proceeded to desoldered said mistakes, and move them respectively to the correct locations. I also bridged a wire between the UP and B Button. So I could use the B button as the torpedo fire button in Beamrider.
I'm not responsible for damage to you or your equipment. Do this mod at your own risk.

